![]()

[Table of Contents]Pasture
Poultry
![]()
Jump down to Building a Greenhouse-Style Pasture Broiler Pen
|
|
Jump down to Building a Greenhouse-Style Pasture Broiler Pen |
|
|
Folks, However, so long as they are on someone else's farm and they are locked up in one of these outfits, then I believe that niche marketing of pasture poultry can mean significant income for many dairy farm families. I personally know three Amish and Mennonite families that net more from pasture poultry than from their intensive grazing dairy herds. 
|
|
|
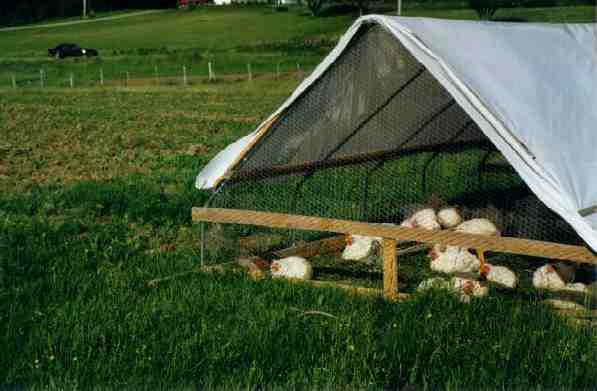
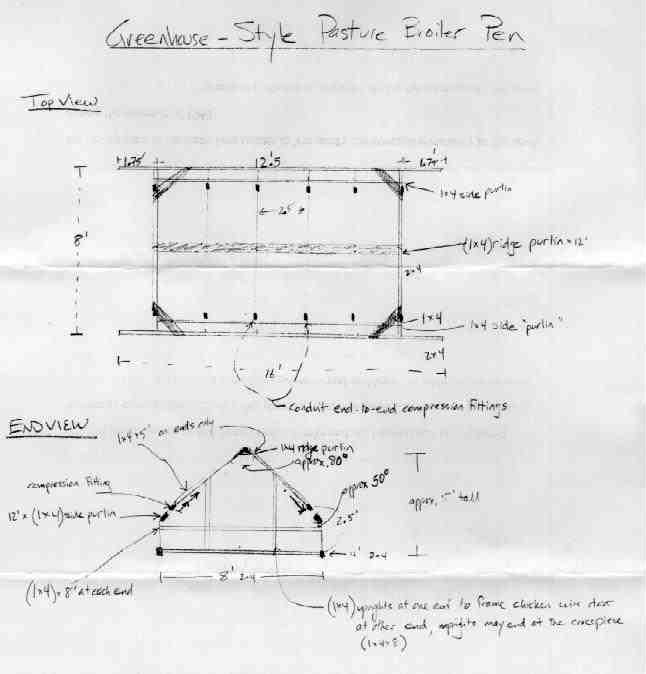
Chris Bailey This structure will allow you to hang a 5 gallon waterer from the center purlin; didn't blow away in 50 mph winds; allows the degree of shade, wind, and rain protection to be easily modified by rolling up or down the plastic sides, or by covering one end in cool or windy weather; and allows easy entry and exit to feed, put in/take out birds. Not inexpensive, though. This design is similar to pasture pens I've seen at two farms in Vermont, so not original at all. I hope these instructions make sense. Materials list:
Assembly 1. Put together the 2x4 wood frame and the 1x4 braces on the tops of the corners. (We have found that the 1.75' extension of the 2x4 at the ends is about right for skidding. The house doesn't need to be lifted very high to allow the back, cross 2x4x8 to clear the grass, bumps in the ground, etc. This makes for easier lifting and less chance of chickens escaping.) 2. Cut 3 of the pieces of conduit into 2.5' pieces, making 12. 3. Using a pipe bender, put a 50 degree bend in each of the 2.5' pieces of conduit at about the 2' mark. (practice with the bender first if you haven't used one before - it took me a couple of bends to get the hang of it -- buy an extra piece of conduit). 4. Using the pipe bender, put an 80 degree bend in each of the remaining six pieces of conduit. 5. Connect a 2.5' piece of conduit to each end of the 10' pieces with the compression fittings so that you now have 6 arches for the greenhouse. 6. Mark the center lines where the sides of each arch will be attached (each 2.5' apart) on the inside of each 2x4x16. Loosely attach (so that you can later stand up an arch with the ends in the straps and then tighten the screws) with the straps about 1.5" vertically apart at each of these points. 7. Insert the ends of each arch into the straps and screw tight the straps on the 2x4s. 8. Put up the 1x4x13 ridge purlin outside of the top of the arches and attach with the straps. 9. Attach the two 1x4x13 side purlins with the straps outside of the arches just above where they bend. 10. Attach the four 1x4x5 pieces on the top of the end conduit arches with straps. 11. Attach the 1x4x8 end boards and the uprights. At the door end, the uprights go up to the conduit and the end 1x4x5's on top of the conduit. At the other end, the uprights can go up only as far as the end board. 12. Cover with 1" chicken wire using a good staple gun and 3/8" staples (INSIDE OR OUTSIDE CONDUIT). If using white greenhouse plastic, cover the entire frame because raccoons will eventually figure out they can cut through the plastic (many small claw marks and tears alerted us before a disaster). Tarps are stronger and you could end the chicken wire a foot or so above the bend on the sides. 13. Make yourself a door out of chicken wire on the door end. Use a thin scrap piece of wood or a piece of batten at the door handle end. Fasten shut with cut and bent pieces of clothes hangar wire (or whatever works). On the other end, cover the whole thing with the chicken wire. 14. Cover the pen with the white greenhouse plastic or tarp (we're switching to tarps. I hope to find a pre-made 14x20 and have a little extra hanging at the ends for shade and rain protection). Screw in screws through pieces of batten strip through the plastic or tarp and into the 1x4 side purlins and end (top of conduit) pieces. With the plastic or tarp that hangs below the side purlins, tie up with string or leave down and tie to or tuck under the 2x4 after each move. 15. Using a bowline (breaks easily, works well), tie the rope around one corner and then across to the other corner at that end, leaving enough slack in the rope to let you easily use your legs to pick up the end of the pen and walk backwards, skidding the pen along on the ends of the 2x4x16s. Reverse direction of travel of the pen by moving the rope to the other end. 16. Watch out for the building inspector - depending on where you live, they may try to call this a structure! |
|
|