![]()

[Table of Contents] Pasture
Water Systems
Alberta Agricultural Engineering
 Folks,
Most of the following is from my e-mail messages to Graze-L. Some is repetitive, some is likely wrong and some is contradictory because I don't agree with myself a lot of the time.
I'm told that some of this is funny. If it is, that's just accidental.
The red text is somone else's comment or maybe a question that I responded to.
Kindest regards,

General Considerations in setting up a water system.
What size pipe needs to be used? Any other ideas on how to set the system up?
- No larger than 1 inch. 3/4 inch will be good enough,
the friction won't seem so bad after you discover the
price of 1 inch pipe.
- Spending extra money will not get you a better
system. Do this as cheaply as possible. Throw away all
graziers supply catalogs.
- Don't bury it for at least a year or until you are
certain of the location. Better still, never bury it.
- Plan on driving right over it for many years.
Crossing it with rubber tires won't hurt the pipe. (Many
Ohio grazers have steel wheel tractors or steel wheels
with rubber bolted on. Both will cut plastic water
lines.)
- Consider cutting the pipe in 200 foot sections with
standard 3/4 inch hose fittings on the ends. One man can
drag 200 feet of pipe at normal walking speed.
- Keep the pressure as low as possible to reduce the
problem of joints blowing apart. You will have many
problems above 50 pounds per square inch.
- Don't stretch the pipe out straight. Leave plenty of
slack. Maybe 3 to 5 feet of slack per 100 feet of run.
This will avoid part of the problem of joints popping
apart when it freezes at night and thaws in the
daytime.
- Buy 2 or 3 big plastic tool boxes from Sears or
K-Mart. Get duplicate sets of water line repair tools and
supplies. Place the tool boxes every 1000 feet and leave
them there pemanently instead of at the barn.
- Consider pumping to a 1000-2000 gallon tank at the
high point of the farm and gravity feeding back down to
the paddocks. Hudson valves work well at very low
pressure.
-FWO
More Pasture Water Equipment Considerations
- 3/4 in flexible black plastic pipe comes in 400 foot
rolls. Cost in 1993 was $42.00 to $44.00 per 400 ft
roll.
- You need about 5000 ft for 50 acres of pasture.
- 5000 ft / 400 ft per roll = 12.5 rolls. 12.5 rolls *
$43 per roll = $537.50
- Tee's are needed about every 100 ft.
- Connect off from the 3/4 inch tee's with a piece of
hose about 3 feet long. Put a plastic male hose thread on
the other end of the 3 foot hose.
- Make a "shut off" by bending the 3 foot hose and
slipping a short piece of 2 in plastic pipe over it.
- Don't buy stainless steel hose clamps. The threads
strip right before they are tight enough.
- Buy one of those tools that allow you to make clamps
from ordinary galvanized wire.
- Tee's with homemade wire clamps and homemade shutoffs
cost about $2.00 each. 5000 ft / 100 feet between tees =
50 tee's * $2.00$ = $100.0
- Buy plastic 55 gal drums and cut them in two. They
cost $10.00 and make two water tanks @ $5.00 each.
- Attach Dare float valves with 5/16 in bolts. Bolt the
float valves about 8 inches down from the top of the
tank. The mounting bracket supplied with the float valve
won't work. Cost of the valves is about $8.00 at TSC or
Farm & Fleet.
- Attach a cheap, 50 foot water hose with an elbow at
the top edge of the tank to prevent kinking.
- You need at least 5 water tanks. Cost is $5 (tank) +
$8 (float) + $15 (hose) = $28 * 5 = $140
-FWO
Think Cheap
What companies can I order catalogs from for plastic water piping?
In my opinion, much of my success with grazing comes from the fact that I'm a miserly, cheap, stingy scrounger.
Think cheap! You don't need a catalog for grazing water system supplies.
- Buy 3/4 inch plastic pipe from your local
do-it-yourself building supply company. The pipe costs
comes in 400 foot rolls and costs no more than 10 cents a
foot. We have some at least 10 years old that is still in
service.
- Don't bury it. It's a big waste of money and will
probably be in the wrong place anyway.
- Tees and hose thread adapters are available cheap, at
any do-it-yourself building supplier.
- Radiator hose style clamps cost a fortune. Avoid
them. Buy one of those little tools that make clamps from
baling wire.
- Make the water tanks from used 55 gal plastic drums.
They cost about $10.00 and make two waterers each. We get
the ones that originally held Cola syrup. But, I'm not
afraid of those that held pipeline cleaner or teat
dip.
- Hudson full flow valves at perfect for water tanks
and cost about $23.00. Don't forget to add a pressure
gauge in a conspicuous place, maybe near your shade tree,
to warn of tipped over tanks or blown apart pipe.
-FWO
Pipe Size
Are you really SURE 3/4 inch pipe is big enough to pump water 4000 feet or more?
3/4 inch is plenty big enough to go at least 4000 feet.
If you are worried about this issue, then make a complete loop around the farm and hook both ends to the main water supply so water comes from both directions at each tap. -FWO
Effect Of Water Availability On Pasture Consumption
FWO GRAZING RULE: Expect a severe drop in milk production if the cows walk more than 200 feet for water.
- Dry matter intake is directly related to water
intake.
- A slight increase in water intake will result in a
significant increase in dry matter intake and milk
production.
- The water tank should be within 100 to 200 feet of
the grass.
- The water tank should be close enough to the current
grazing area that the cows go to drink individually.
- If the tank is more than 100 to 200 feet from the
grazing area the cows will begin to visit the tank in
groups or as a herd.
- If the cows visit the tank as a herd, they will
overwhelm its refill capacity and begin to struggle for
water.
- The idea is to get the cows to step away from the
grass individually for a moment many times a day for a
quick drink of water.
- Cows will not drink enough water from a creek to milk
more than about 50 pounds.
- Cows will cross a creek to drink from a water tank
that they are accustomed to using.
- Always have a full water tank in the pasture when the
cows return from milking.
- Imagine yourself in a situation where all the cows
are thirsty and you are beating them back with a stick to
allow the tank to fill.
-FWO
Unrolling 400 foot rolls of black plastic pipe.
Don't try to unroll a new 400 foot roll right along the fence into it's final location because you will probably drive yourself crazy.
Unroll it in a big open field. Don't worry about kinks, they are unavoidable. The worst that can happen is that you may end up cutting and splicing.
If you succeed in unrolling, which is doubtful, then drag it several hundred feet in each direction, and repeat this several times to get the twist out of the pipe. Finally, drag it to the installation site.
Find someone that you don't like to help with this job. -FWO
Substitute ingenuity for money
What I ended up with is about 6000' of 3/4" pipe on top of the ground, this feeds a 1000 gallon tank on a wagon running gear on which I have water troughs on each side and my mineral feeder on the back...Had 150 head drinking out of it last summer and never really got ahead of the tanks reserve.
Ingenuity can be substituted for money. There is always an inexpensive way to solve farm problems. This will work, and doesn't involve buying very expensive large diameter pipe.
Water Emergencies
We are having severe water supply problems. It seems that our pipe diameters are to small. Many times we find that the water troughs have been emptied by the heifers/steers and they have to wait until it fills up again. This puts a lot of strain on the animals.
It happens. Everyone with large groups of cattle in a paddock eventually has this problem, even with the right size of pipe and water tank. On my farm, the cause is often a break in the water line or failure of a float valve.
On my farm, I have a very large tank along one of the lanes that is always full and large enough to satiate the entire herd at once in their most desperate thirst. When we get into one of these water emergencies, we allow access to this emergency tank so the cattle can catch up on water. This gives us opportunity to fix the problem with the water system and get the tank back in the paddock full again.
Before adding the emergency tank, I spent some long afternoons after a water system failure with a fence post in my hand, standing over a water tank, trying to ration out water to a bunch of thirsty cattle. -FWO
Can the Water Get Too Hot?
We also found out that water temperature is critical. Any comments on this?
In 12 or 14 years of intensive grazing, I only had one time when the water got so hot that the cattle wouldn't drink it, even though they were desperately thirstly and were burning their tongues touching the water.
It was during the drought of 1988. The tank was 3000 feet from the barn through black plastic pipe. The water in the tank, when I got there, was over 120F or 49C and the cattle wouldn't drink. I dumped the water, stood over the tank with a fence post, and eventually the water coming out the pipe got down to 110F or 43C, and they began to drink. There were 180 head standing over me, while I was standing over the tank. As I recall, I stood over that tank for something like 6 hours before the cattle settled back to normal. Have you ever been thirsty enough yourself to drink hot water out of the cow's water tank? Don't say the day won't come. -FWO
Detecting broken water lines and tipped over water tanks
A large, easy to read, pressure gauge on a branch of the water system near my house has helped me recognize water emergencies much more quickly. It would be easy enough to rig a pressure gauge to a flashing red light.
I have an air conditioned office from which I can see the water pressure gauge. On extremely hot days, I check the pressure out the window very often, and am out into the heat like a shot out of a cannon, if the pressure drops below 20 pounds per square inch. -FWO
Were to buy Hudson Valves
I have not received any response to my request for Jobe high volume float valves. Other brands would probably also be acceptable. The high float valve appears key to getting my farmers to set up an MIG system. I have 5 people looking to move to MIG this year. Please let me know if you know of a source. Thank you.
The high volume float valve we use is the Hudson valve. Order from Modern Farm, 1825 Big Horn Avenue, Cody, WY 82414. Catalog # 6520. Price is $27.50. Phone 800/443-4934. (These things work kind of like a Sentinel vaccum regulator only backwards.)
Also you can order from: Joseph M. Hurst, 1832 Plymouth East Rd., Plymouth, OH 44865. 419/687-5801. His price is a lot less. Joe is a dairy farmer who sells and services milking equipment for the people in the Shiloh Grazing Council. He doesn't specialize in mail order or have a big inventory but will eventually get the valves to you. -FWO
Cutting 55 gal Plastic Water Tanks in Two
We have 2 55-gal plastic barrels cut in half for conversion to watering tanks. So far so good.
It seems like nobody could screw this up, but I suggested to a retired engineer, now a grass dairyman, that he cut plastic 55 gal drums in half to make water tanks.
He went home and cut two perfectly good drums in half lengthwise.
He's been having a terrible time with those four water tanks. He's been struggling with them for a year. Claims they keep rolling over and dumping the water out.
It shows that you really have to be careful about what you say, especially to literal minded engineers with no common sense. -FWO
Sealing plugs in water tanks made from 55 gal plastic drums
The screw caps or plugs on the 55 gal drums should be sealed with silicon gasket sealer (an automotive product). -FWO
Homemade portable water tank fitted with a Hudson valve
My current favorite valve is the "Hudson" valve. We screw a "street ell" into the top of the Hudson, then another "street ell", then a ten inch "nipple" and finally a "hose thread adapter" and a 50 foot garden hose. This assembly is then hung over the side of the water tank. It isn't essential to fasten this assembly onto the tank, but we drill two little holes (above the water line) and wires the nipple to the tank with light gauge wire.
                              00X00 <-- two street ells
          |                   0 | 0
  half    |                  /\ | X
  of      |   Hudson valve->|  ||=0 <-- wired onto tank here
  55 gal  |                 |__|| 0
  drum--->|                     | 0 <-- 10 inch pipe nipple
          |                     | 0
          |                     | 0
          |                     | # <-- hose thread adapter
          |                     |  s
          |                     |   s     50 foot garden hose
          |---------------------|     s s s s s s s s s s s s s
Where to buy a ClampTite Tool
Modern Farm, 1825 Big Horn Avenue, Cody, WY 82414, also sells a device called a ClampTite (cat# 6660, $19.95). This tool is used to make pipe clamps from baling wire. I couldn't maintain my water system without this thing. Regular hose clamps cost around $1 and the threads strip before I can get the clamps tight enough. There is no limit to how tight I can make the clamps with the ClampTite tool and the cost is zero. -FWO
Repairing Water Lines
Do you heat the ends of your black plastic pipe before putting fittings in? I'm told that you get a much better fit that will not come apart easily.
I suppose that on original installation, it would be possible to heat the end of the plastic pipe and get a better, tighter fit.
However, the scenario during my repair sessions is generally not conducive to heating the ends. I am usually making repairs with the system under pressure.
The normal situation is that I am on my knees in a puddle of water, holding the ends together with both hands, while also operating the ClampTite with both hands, while being sprayed from head to foot, and swearing like a madman.
By the way, the water line is most likely to pop apart the morning after a frost. My 2nd biggest cause of water line problems is from mowing over then or cutting Canada thistles under the electric fence. -FWO
Winter Water
This year we are going to winter our heifer herd outdoors. They will have 8-12 paddocks for loaf/feed areas to rotate through and a shed for severe weather such as wind and storms. Can you folks that deal with below freezing weather suggest how to keep their water available to them? Thanks much!
I believe there are 3 sets of winter weather conditions to consider with regard to providing water to dry cows and heifers.
1. Days with snow accumulation on the ground.
2. Days the ground is frozen but there is no snow.
3. Days the ground is not frozen and no snow accumulation.
Days with snow accumulation on the ground
In my experience, if there is snow on the ground efforts to provide water are wasted. My cattle won't drink water under these conditions so I no longer attempt to provide water if there is snow accumulation. They can just remain in the pasture with no water.
Days the ground is frozen but there is no snow.
If the ground is frozen, there will be no damage to lanes. The water solution in this case is to open the gate and allow the cattle access to the barn for an hour or two. Keep the time short so the manure is distributed on the pasture. Manure in the barn will need to be hauled. Manure in the lane will be totally wasted.
Days the ground is not frozen and no snow accumulation.
Here is the real problem. The lanes will be ruined or at least damaged if the cattle are taken to the barn for water. Maybe get them into that shed you speak of and bang the gate shut until it snows or the ground freezes (or dries out).
I have had a bit of luck in that one of my tall fescue infested pastures has a rock pile on one edge.
The field tile draining about 30 acres discharges somewhere under that rock pile.
Cattle can always get water in that rock pile.
That particular paddock makes a great place to put them on days the ground is not frozen and there is no snow. That darn tall fescue is impossible to damage. -FWO
Getting water up high hills
What are your suggestions for moving water over several hills about 140 feet in height?
There is a grazier in Ashland County, Ohio, that has a hill so steep and high that, I kept leaning back for fear I would fall into the top of his upright silo. That hill, has got to be 300 feet above the milking parlor. I don't know which was worse: Driving up and down that hill with him in his truck, or playing tag up there with his full size Jersey bull.
Anyway, He ran a plastic pipe straight up the hill, from near the milk house to a 2000 gallon tank sitting in an old dump truck on top of the hill. He has an old "piston" pump that he salvaged from his hired man's basement. He runs a water hose from the milk house out to the piston pump. They pump water up the hill every day for a few hours. There is a check valve on the uphill side of the piston pump. The piston pump is bolted to a piece of plywood and is sitting beside his milk house.
I've seen a lot of these old piston pumps in basements of old farm houses. His looked at least 50 years old. The advantage of a piston pump in this application is: when the piston travels through it's stroke, the water has got to go up the hill. It doesn't matter how high the hill is to a piston pump, but you might have to change the pulley size on the pump or motor. A regular pump might not be able to overcome the head.
Up and down the hill, he has taps for water tanks. He also has addition gravity flow feed lines radiating out from the tank down the far side of the hill.
This system works very well and since this guy is cheaper than I am, I know for certain that it couldn't have cost more than a few hundred dollars. -FWO
A Pasture Mist Generator - Esstential Part of the Water System
Last summer we were visiting dairy farms in southern Ohio where the temperature was 106F or 41.1C with 100% humidity. We drove by at least six dairy farms with dead cows pulled out in front of the barn. Presumably, a few farmers would have had the common sense to pull them out behind the barn, so there were probably many more.
Back at Owenlea Farm, on the same day, son Blake was in charge of our herd. He had 104F that day but managed to keep our cows fairly cool. Our cows were outside all day with no shade but he was able to keep them moist and there was some breeze. The crude drawing below may give you some idea of how our mist generator operates. With the help of the breeze, we were able to mist an area about 30 feet X 200 feet.
                   ......
                 ................
           ...... ..... ..........    height at nozzle
        ....... .. .. ......     \\   12-14 feet
    ..................            \\
   .... ..mist... ...              \\
   .. ..............                \\
  .......... .. .. .....             \\ 10 foot plastic
 ........................             \\     pipe
                                       \\
                                        \\
 <-----------------------                \\
    Up to 200 foot drift                  \\
    in a light breeze.                //\\ \\
                                     //  \\ \\
                                    //    \  \\
                                   //      \\ \\
                                  //        \\ \\
                                 //==========\\  S
                                //  6 foot    \\  S   water
                               //   step       \\  S  hose
                              //    ladder      \\   S S S S S S S S S
Instructions to Build and Operate a Mist Generator
- Start with a 10 ft section of 3/4" rigid plastic
pipe.
- Glue a plastic cap on one end and a hose fitting on
the other end.
- Twist drill 2 or 3 very tiny holes in the plastic cap
by twisting in the tip of a sharp knife. Your smallest
drill bit will be much too large.
- Get a solid six foot step ladder.
- Fasten the 10 ft plastic pipe to the top half of the
step ladder with 2 or 3 rubber canvas stretchers.
- Set the ladder just over the fence away from the cows
and attach it to your water system.
- In the absence of a breeze, the mist will cover an
area big enough for 30 cows. The mist area will be much
larger if there is even a tiny breeze. In a slight breeze
mist will carry up to 200 ft.
- The cows will soon establish a circular pattern of
drinking, then grazing, then standing in the mist, then
drinking and so forth. Only a few of the cows will be
under the mist at any point in time.
- Move the ladder 2 or 3 times on hot afternoons to
spread the manure.
-FWO
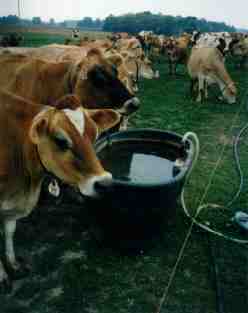
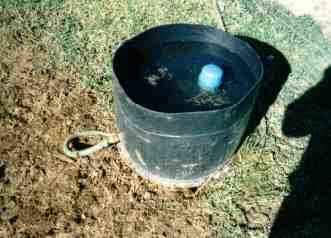
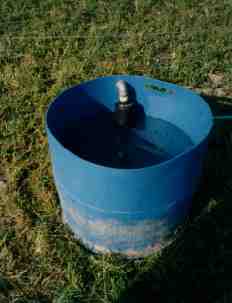
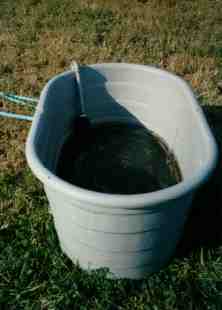
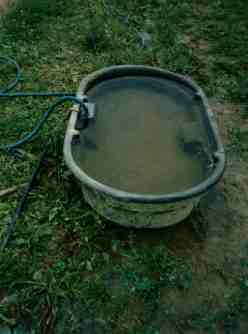
Water Tank Photos
Some of these are kinda ugly. But, the buggers with the really ugly water tanks wouldn't let me take their pictures. I guess I shouldn't have asked them to pose with their tank. You know the type: Cow poop in the tank, an inch of moss growing in the tank ,and those that had been running over for 2 weeks without being moved. -FWO

[Table of Contents] [Top] [fwo@ bright.net]